Data Import
Row Zero supports a number of different methods for importing data into a Row Zero spreadsheet. Data imported into Row Zero can be imported straight into cells, like traditional spreadsheets, or into a data table, which are immutable tables that make it easy to work with large, connected data. The following are all the options for importing data into Row Zero.
- File upload
- Postgres
- Snowflake
- Databricks
- Redshift
- BigQuery
- S3 - connect bucket
- S3 - import from link
- Shared data sources
- Create "Open in Row Zero" links
- Import with python - from API
- Copy/Paste
- Open large file formats
- Troubleshooting import issues
File upload
Row Zero lets you import a variety of file types including CSV, TSV, TXT, Parquet, JSONL, XLSX, .gz and more. From any workbook go to Data > Import file.  Row Zero can import 10s of millions of rows on a free plan (up to 5GB) and can support a billion rows on Enterprise plans.
Postgres
View instructions here: Postgres to Spreadsheet
Snowflake
View instructions here: Snowflake to Spreadsheet
Databricks
View instructions here: Databricks to Spreadsheet
Redshift
View instructions here: Redshift to Spreadsheet
BigQuery
View instructions here: BigQuery to Spreadsheet
S3 - Connect bucket
The following instructions explain how to create an IAM role in AWS S3 and grant permissions for a Row Zero workbook to connect a specific S3 bucket and ingest data. To begin the process, in the Data menu, select Import from Amazon S3. 
You will see a link to the public datasets S3 bucket and a button in the upper right hand corner that says + connect bucket. Click the button to connect a new bucket. The public datasets bucket is available to demo the integration and Row Zero features. 
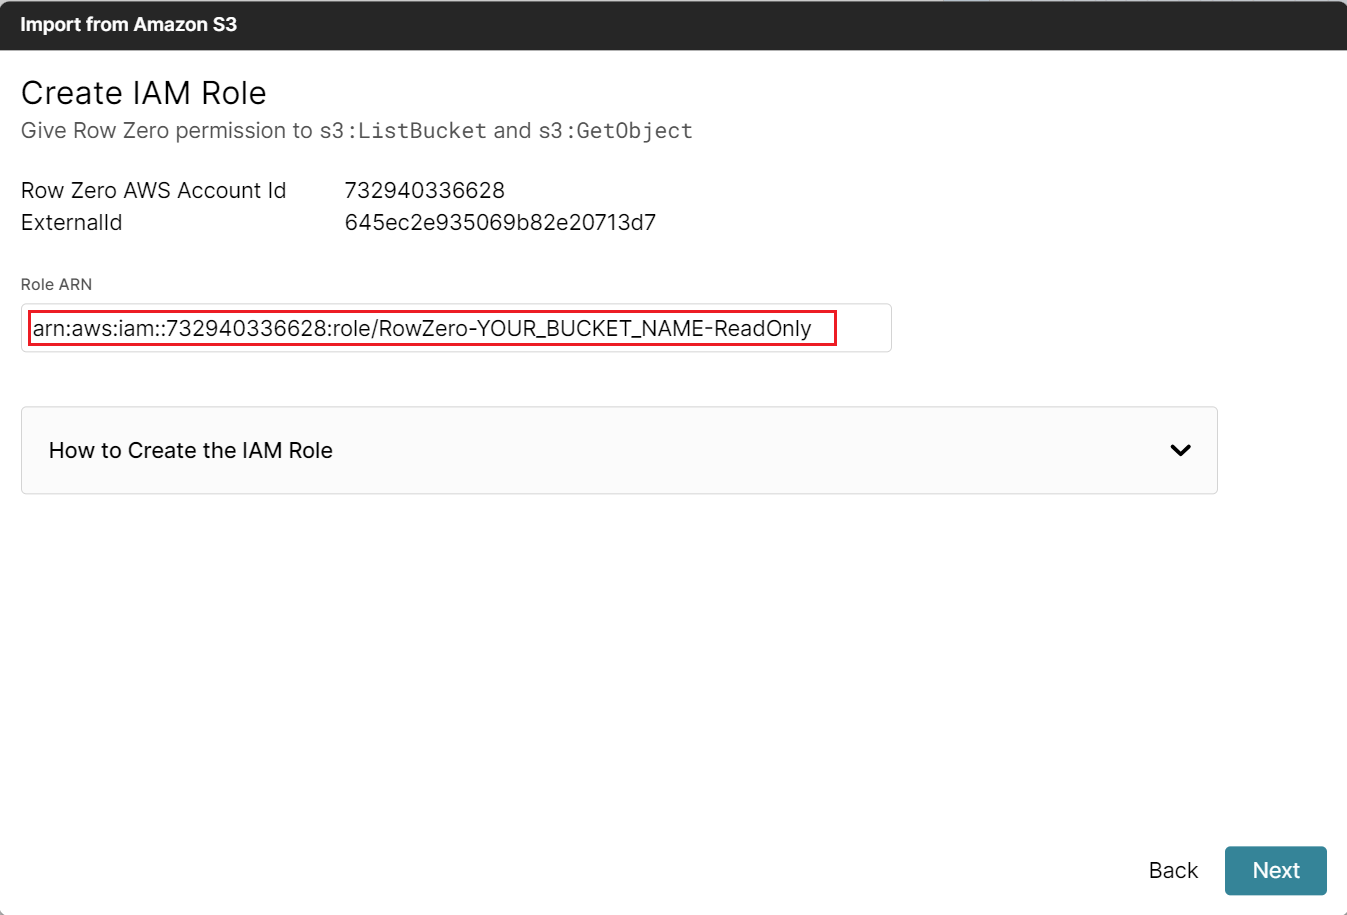
The first step is identifying the bucket name you intend to connect to Row Zero and entering the name in the provided text box.  Next, provide the Amazon Resource Name (ARN). To identify the name, follow the instructions below to create an IAM role for Row Zero and grab the ARN from the AWS console. At the top of the screen your Row Zero AWS Account ID and your External ID will be visible. Both will be needed to create the IAM role.
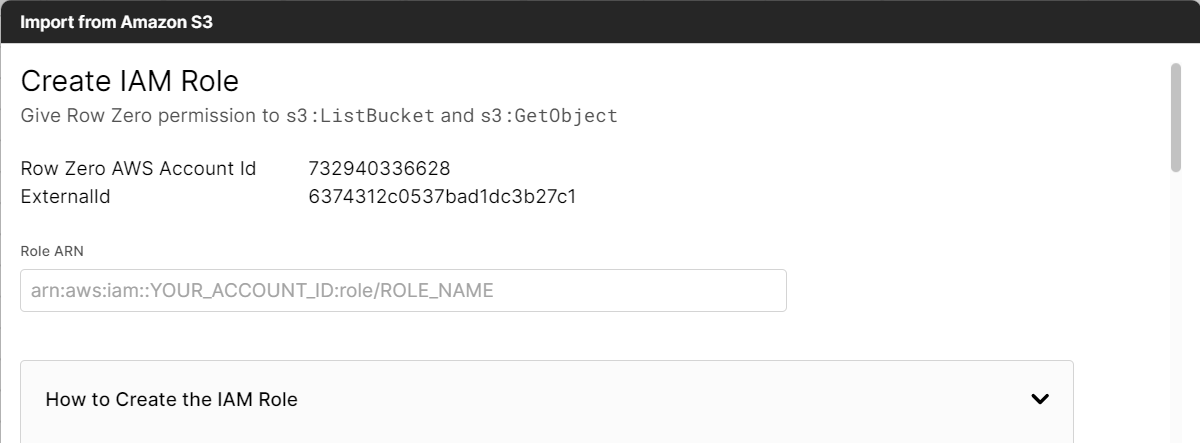
Create an IAM Role
Log in to the AWS Management Console
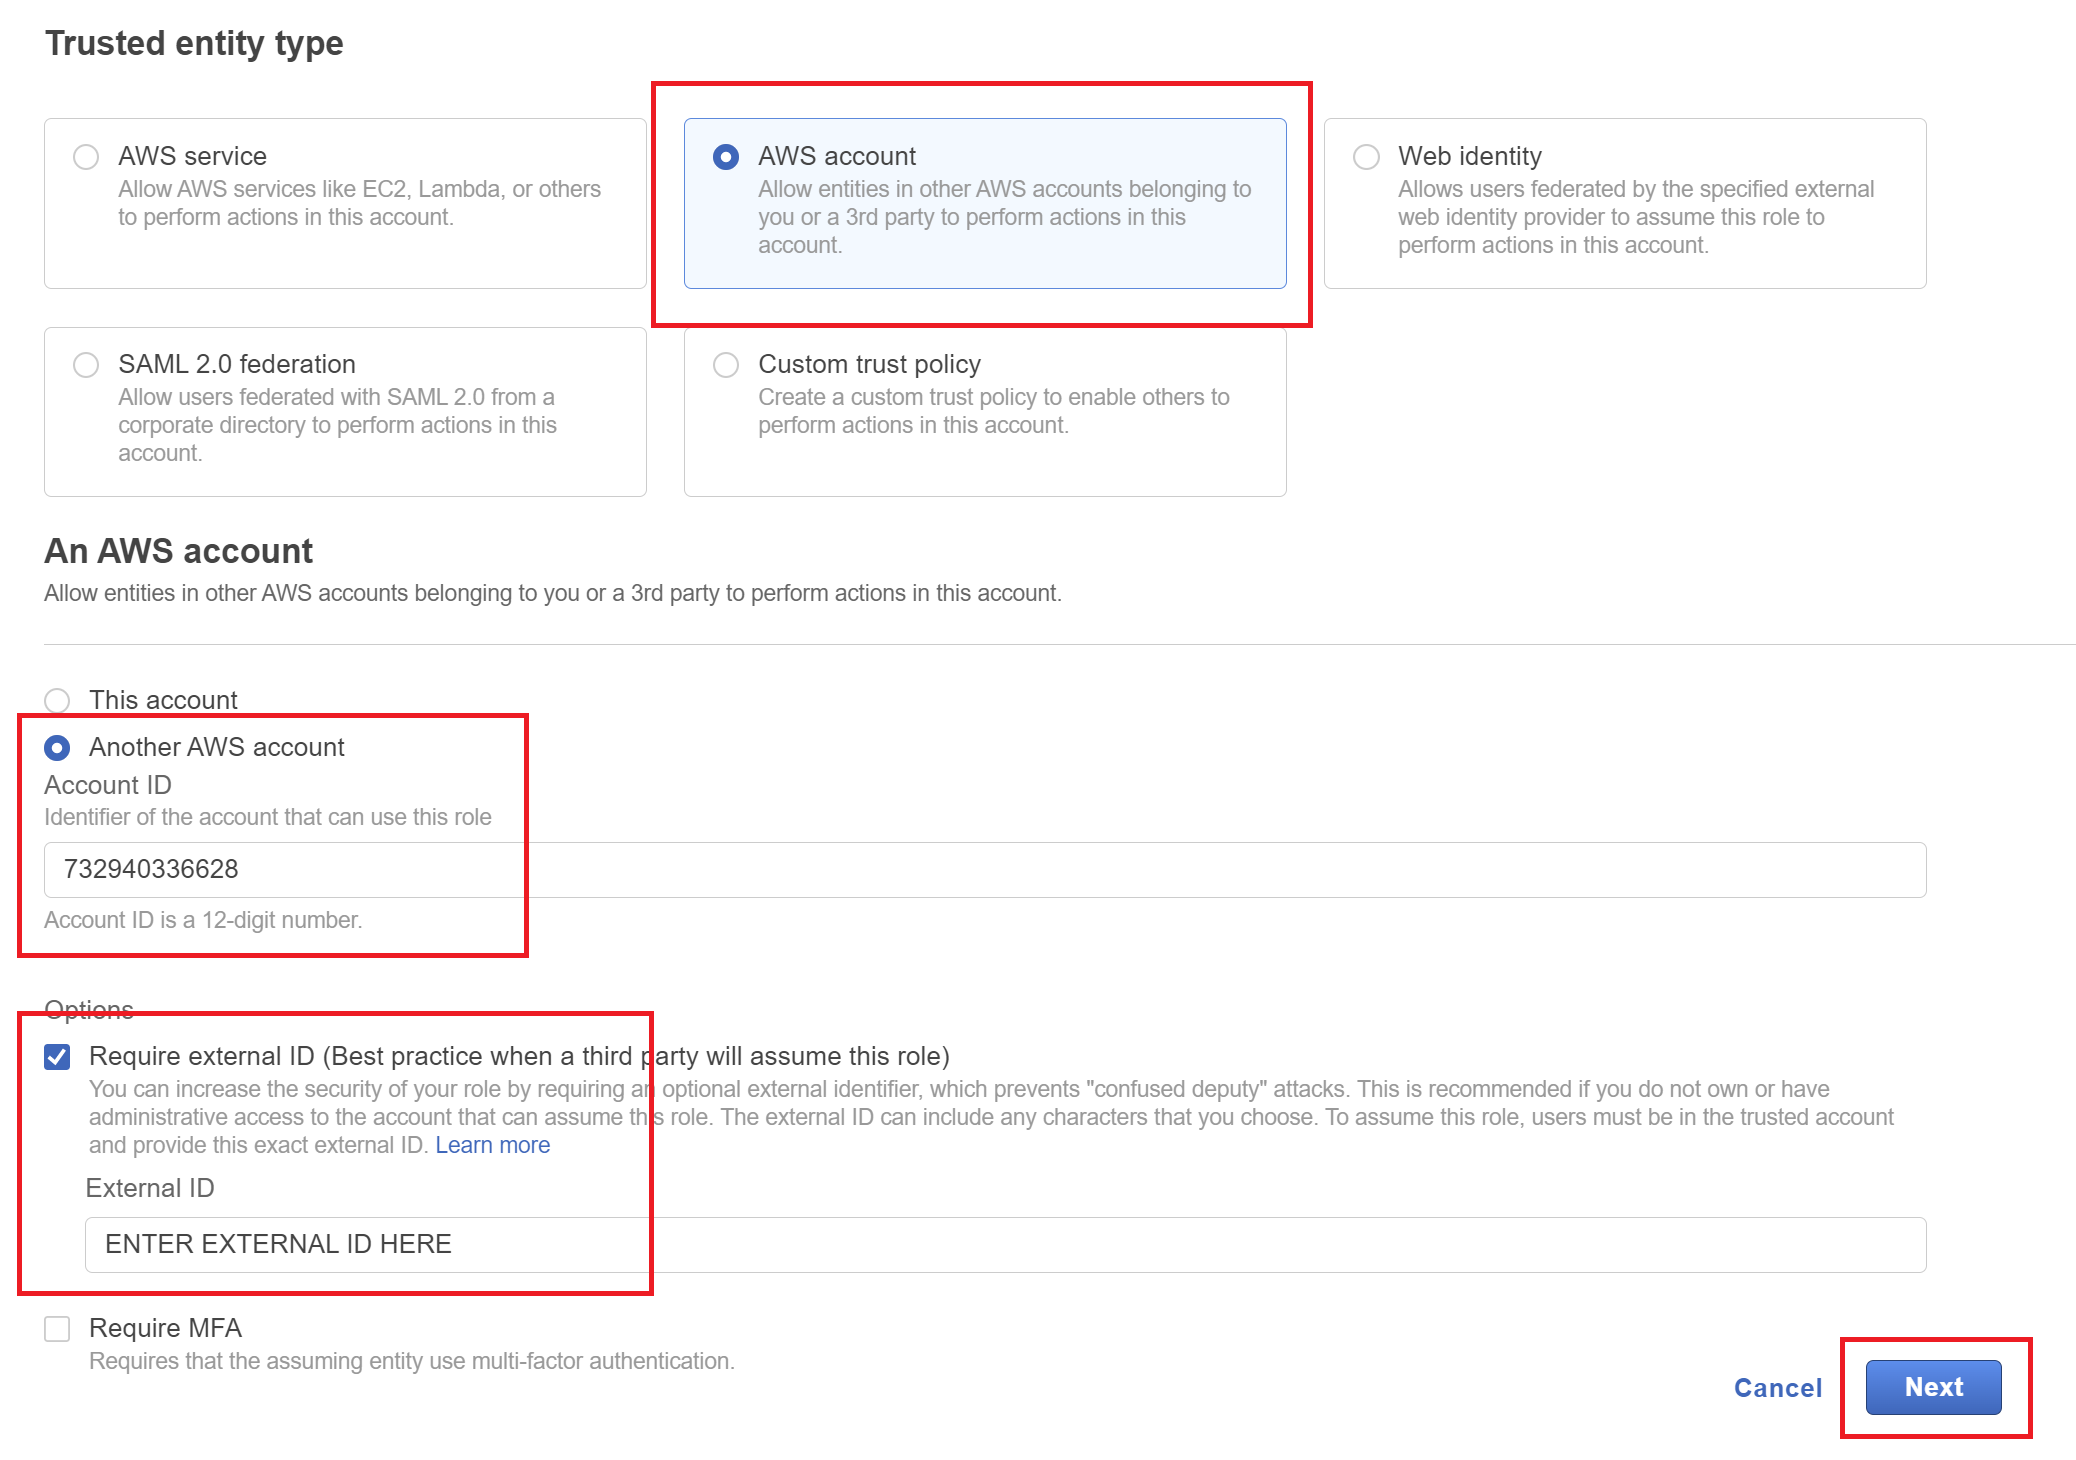
Select AWS Account
Select Another AWS Account and enter 732940336628 as the account ID
Select Require External Id and enter Your Account ID
Click Next
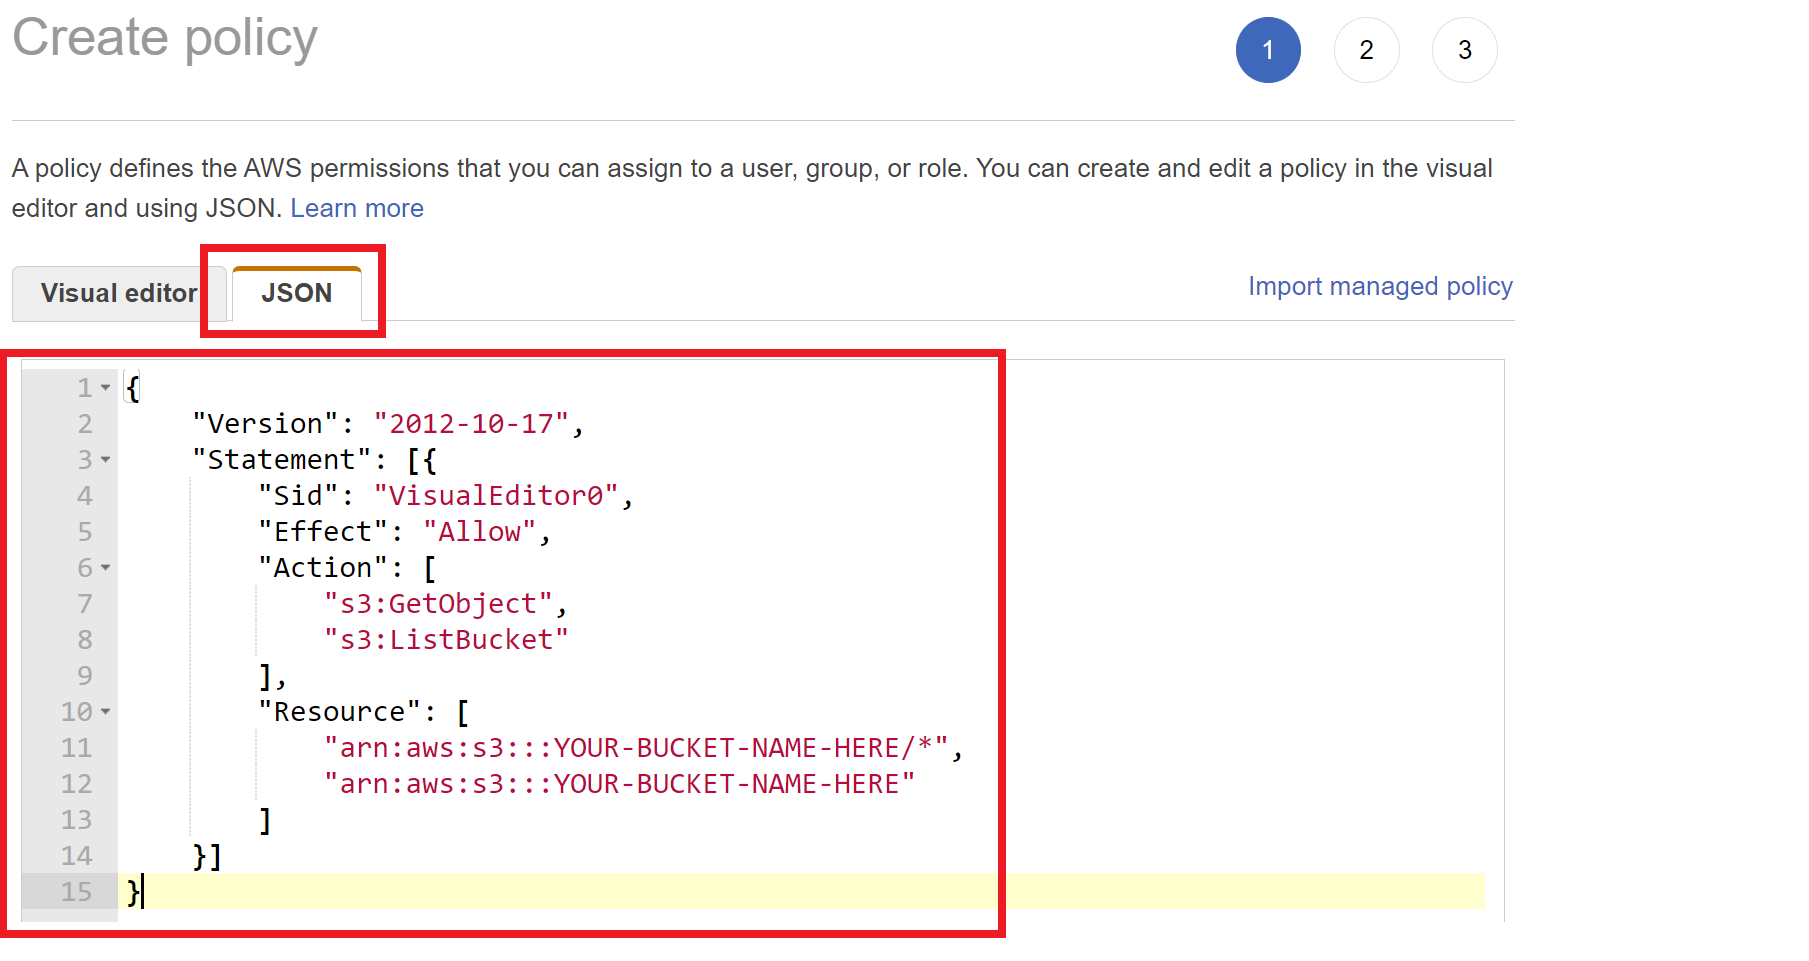
Select Create Policy (this will open a new tab)

Select the tab that says JSON and replace the text with this:
Click Next: Tags
Click Next: Review
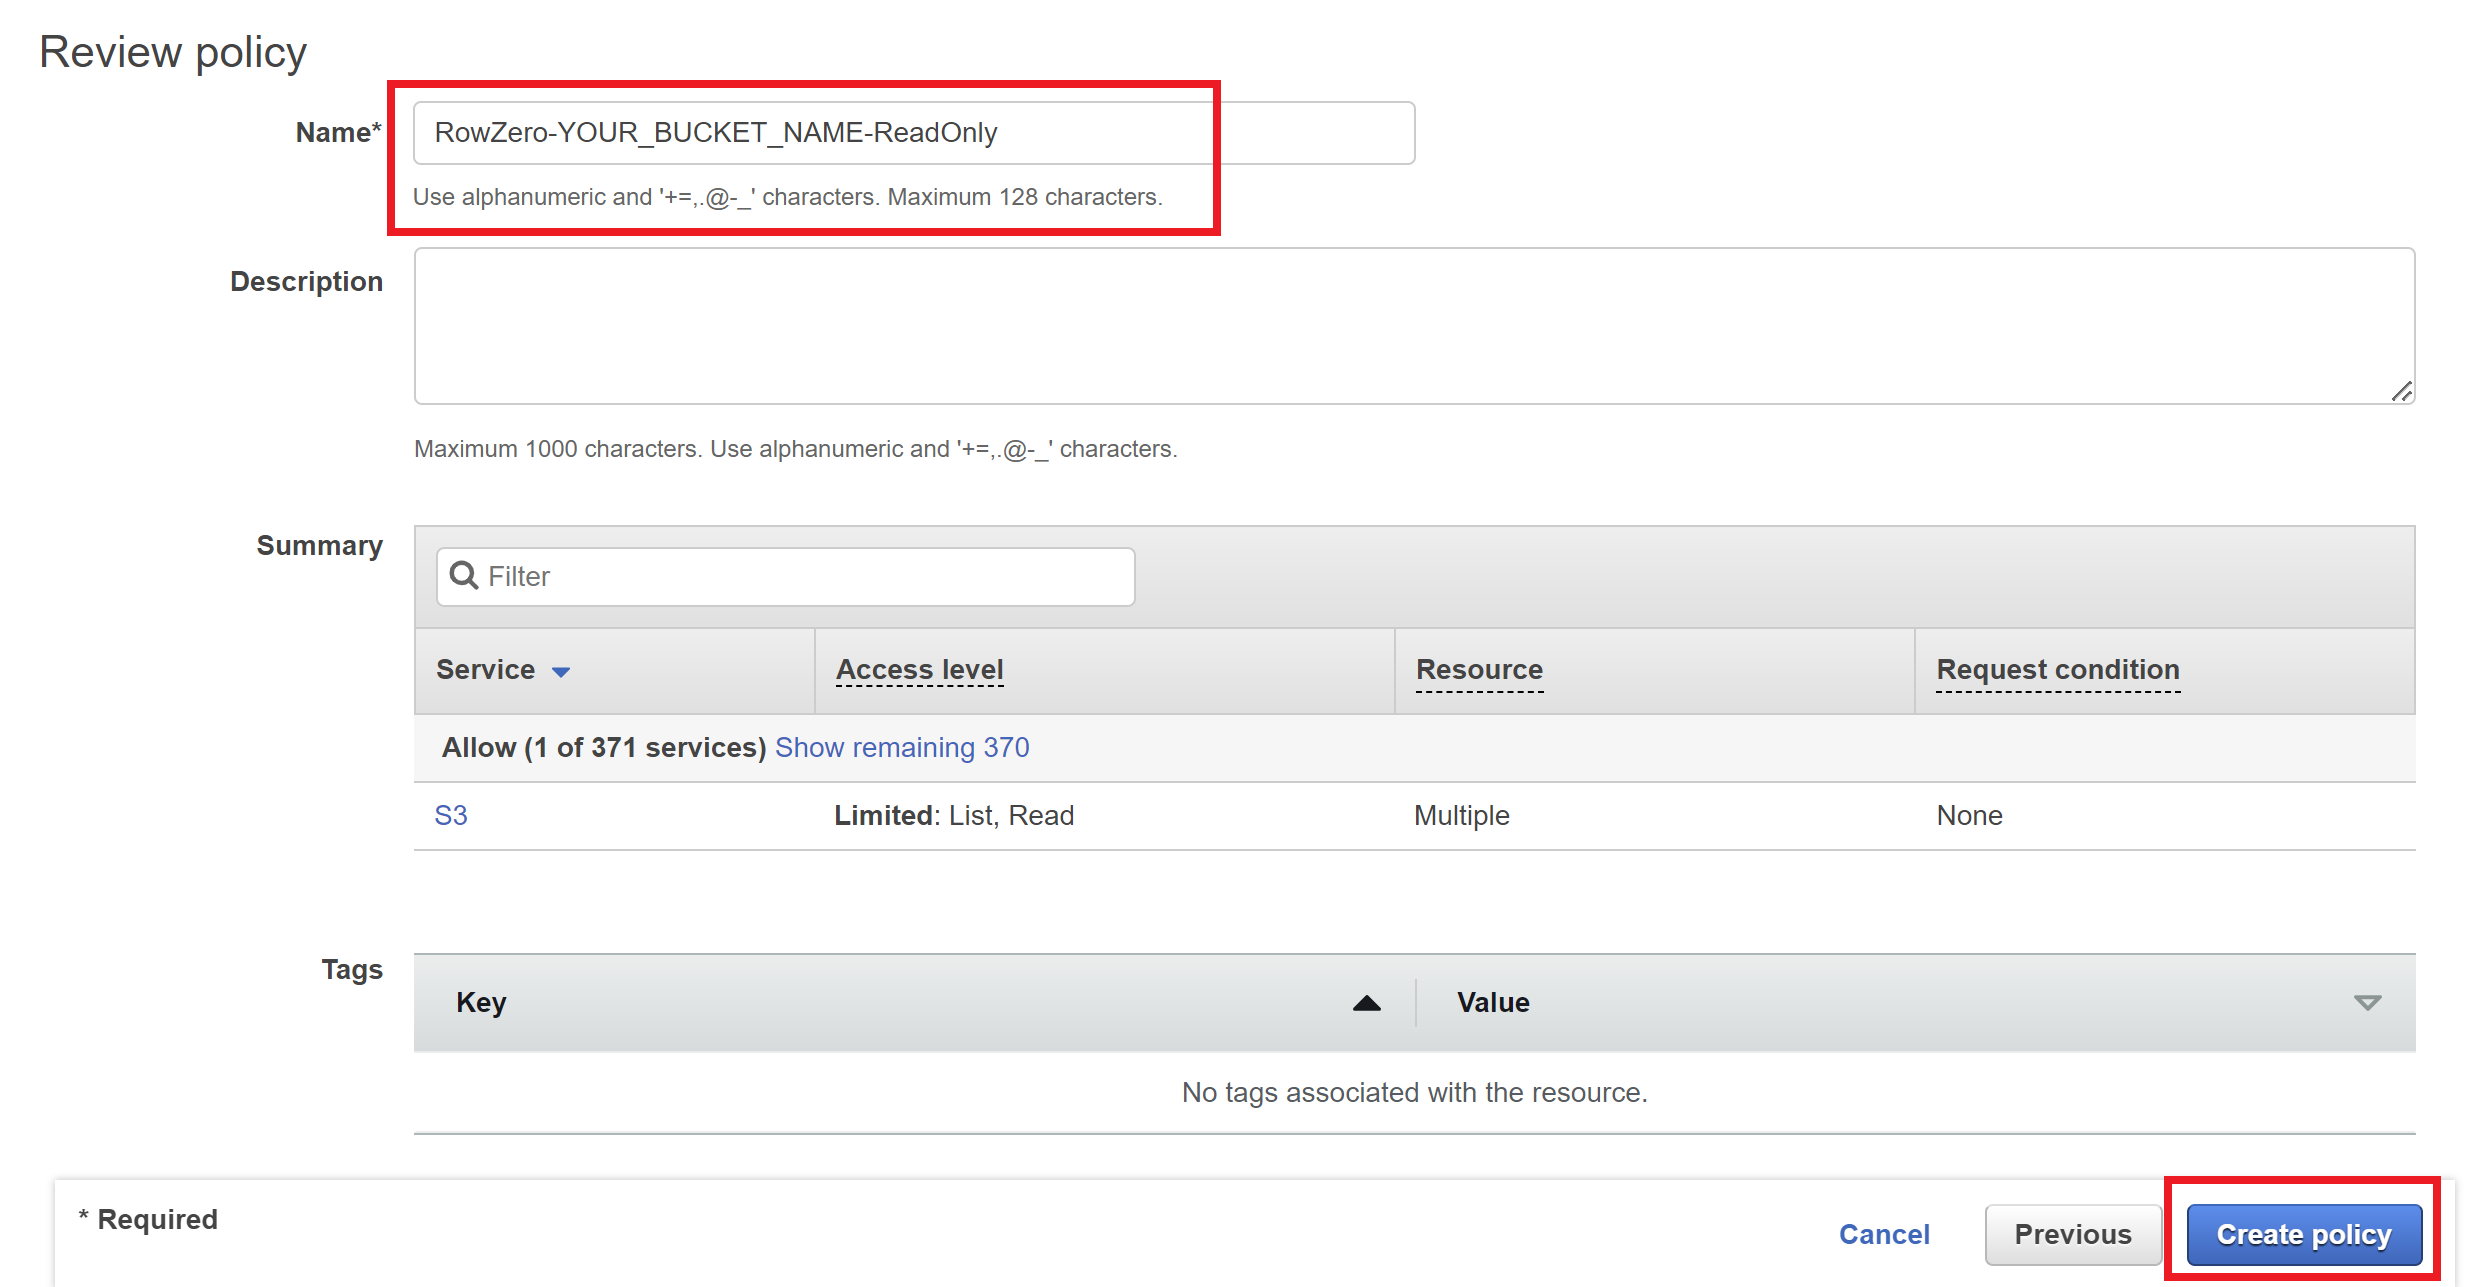
Give the policy a name like 'RowZero-myS3bucket-ReadOnly'
Click Create policy and close this browser tab
On the first browser tab, refresh the list of policies
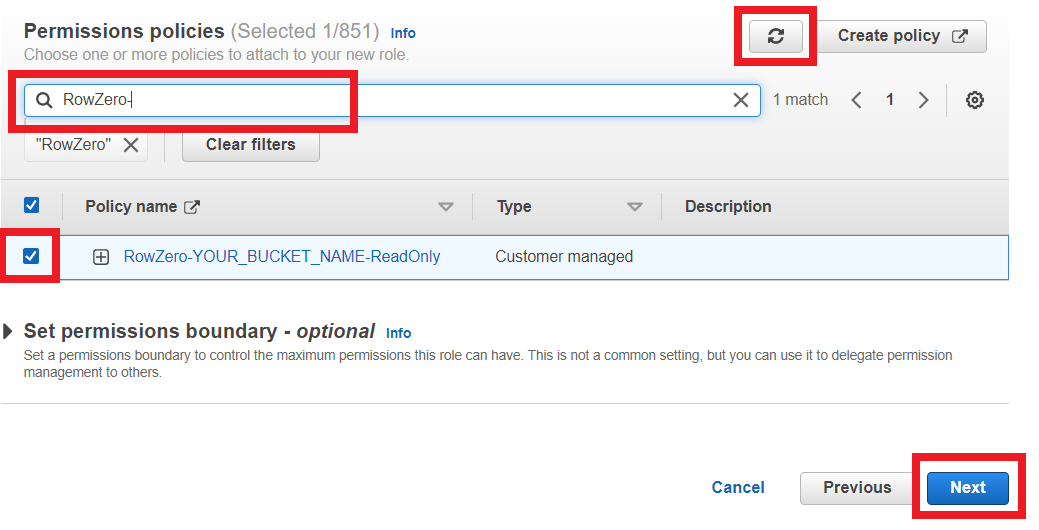
Search for the policy you just created (e.g. RowZero-myS3bucket-ReadOnly), click the checkbox to its left, and click Next
Give the role a name, like RowZero-myS3bucket-ReadOnly
Scroll to the bottom of the page, and click Create Role

Click View Role at the top of the screen and copy the role ARN and paste it in the text box at the top of the window. Click Next.


Shared Data Sources
The Data Sources feature lets teams share queries as dynamic data sources that can be refreshed or scheduled to update automatically. This is an easy way to give less technical users one-click access to live updating data from governed, "source of truth" datasets. 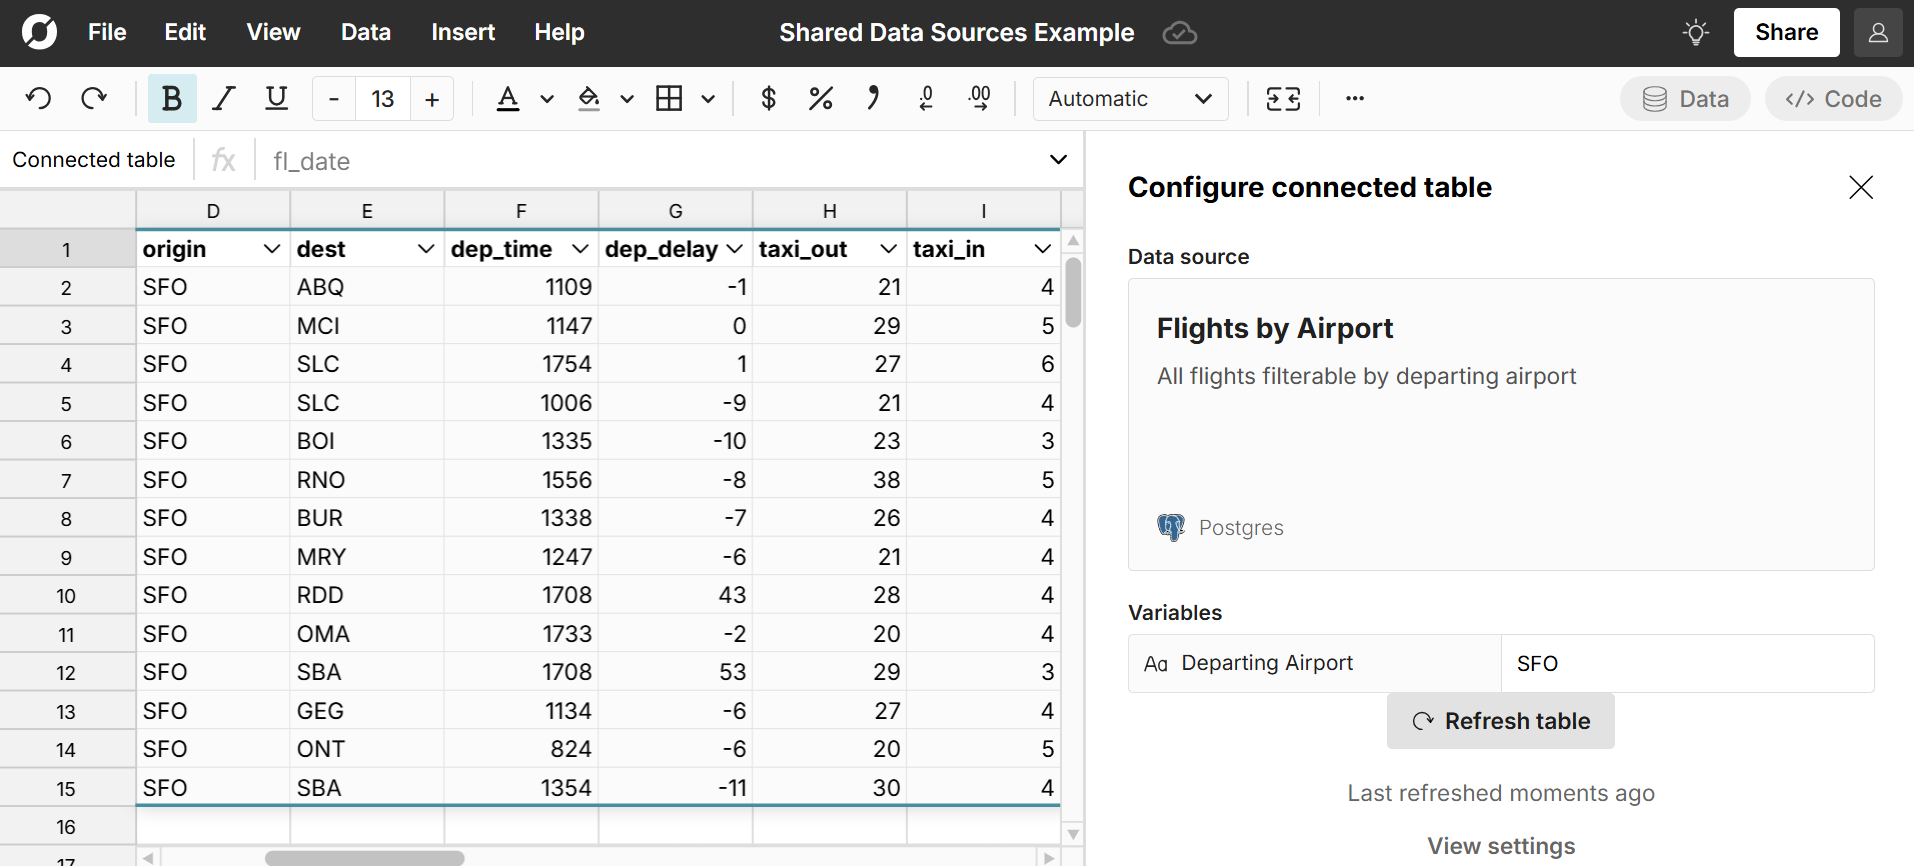 Note: The Data Sources feature is only available on Business or Enterprise plans.
Create "Open in Row Zero" links
Users can create dynamic Open in Row Zero links that will open the latest version of a linked file (e.g. CSV, parquet, etc.) in a new Row Zero workbook. You can create dynamic links to open a file by using the following URL structure: https://rowzero.io/new?link=INSERT_YOUR_LINK_HERE and replace INSERT_YOUR_LINK_HERE with the URL of your file.
Copy/Paste
Copy and paste data from Excel and Google sheets into Row Zero using CTRL+C and CTRL+V commands.
API - Import with Python
Use the Python code window to connect to APIs with Python. Use the code window to write functions that call APIs and return requested data.
- Import package that connects to API
import yfinance
- Write a function that calls the API with a request
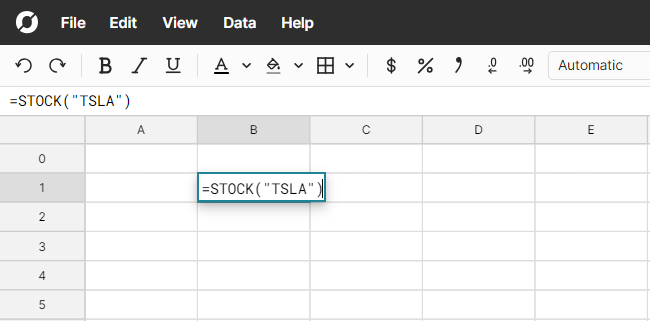
def STOCK(ticker):
return yfinance.Ticker(ticker).history(period="max")
- Run code window with 'run' button or 'Shift+Enter'
- Use the function STOCK() in any spreadsheet cells to display data frame
Explore examples for importing data with python: yfinance, nfl-data-py, pybaseball
Open large file formats
Row Zero makes it easy to open large files and big file formats. Here are posts for how to open big CSVs, parquet files, JSONL files, and large txt files. Row Zero also lets you open .gz files and automatically will decompress and unzip the .gz file for you.
Troubleshooting Import Issues
There could be a number of reasons why your file fails to parse or import correctly including extra or missing commas or quotation marks, unescaped quotes, inconsistent formatting, invalid characters, or spreadsheet features we do not yet support.
Importing CSV files
The CSV file format has no inherent data validation so it's fairly common for CSV files to have errors. You can save any plain text file as a .csv even if it has invalid CSV content or formatting. Our importer attempts to detect and account for these errors, but some errors will cause your file to fail to parse or open correctly.
To troubleshoot CSV errors, it's important to know what a properly formatted CSV file looks like. CSV are plain-text files and are typically structured with fields enclosed by quotes and separated by commas:
"Name","Town","ZIP"
"Owen Smith","Boston","81234"
"Roger Jones","Denver","71533"
"Max Collins","Pittsburgh","15213"
There is typically a header row and a new line for each entry. Each row needs to have the same number of comma separated values. When there is missing or inconsistent formatting or invalid characters, your file may fail to parse correctly.
Import warnings
If you see an import warning message like the one below, it means your file was imported, but possible errors were detected during import, so you'll want to double check your imported data. 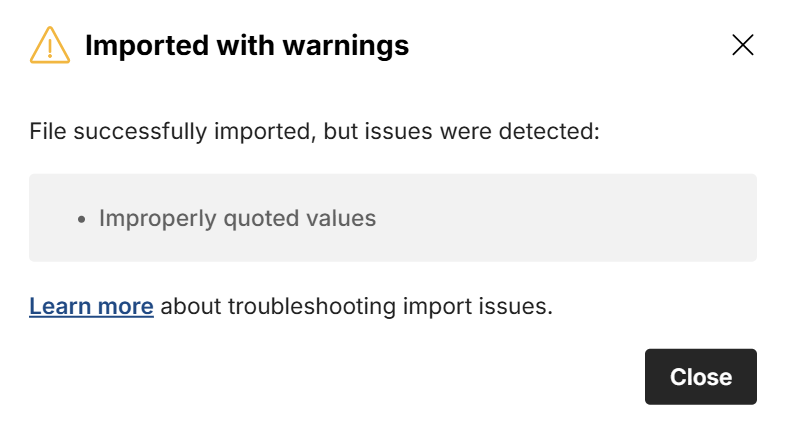
Here are possible warnings:
- Improperly quoted values - CSV files should enclose fields in quotes to ensure punctuation within fields is handled correctly. If any fields contain quotes, they should be escaped by adding an extra set of quotes around the quoted value. See #1 and #2 common import errors below for more detail.
- Not all rows have the same number of fields - CSV files should have the same number of fields in each row. If some rows have more than others, it can cause parsing errors and some of your columns and rows may not line up as expected.
- Some values were too long and were truncated - Cells are limited to 50,000 bytes on import. If a field contains more than 50,000 bytes, it will be truncated.
View the full list of common import errors below.
File fails to parse or import correctly
If you see a preview of the file that looks correct (like the one below), but the file fails to parse correctly into multiple columns when you click Import then this likely means that there is an issue with your file below the first few dozen lines (which correctly populate the preview).
 If the file imports into one column, you can try using the Split text to columns feature to split into columns, but you may still have an underlying issue in your data.
If your file does not correctly populate in the preview but the progress bar completes, then your issue may be in the header or appear in the first few dozen lines.
If the progress bar does not make it to completion or your file loses connection, there could be a number of issues, including problems with the file itself or your file exceeds the memory available on your plan. See importing large files below.
Common import errors
Note: these issues are with the CSV file itself and not unique to Row Zero.
Fields not properly enclosed in quotes: CSV files are typically formatted with fields enclosed by quotes and separated by commas. While not required, enclosing fields by quotes ensures that a CSV importer won't get confused by commas or other punctuation within a field. For example, when a field contains a comma like "Seattle, WA" it will cause errors if not enclosed in quotes:
"Name","Street","City_State","ZIP"
"Jill Smith","1234 Main St","Seattle, WA","98109"
"Jacob Jones","5615 Lake Dr","Chicago, IL","60652"
"Russel Collins","1712 Shady Ave","Pittsburgh, PA","15218"
In this example, if your CSV does not enclose fields in quotes, Seattle and WA will be considered two separate fields which will likely cause rows to have different lengths and mess up your import.
Unescaped quotes: If a field in your file contains quotation marks, they must be escaped, usually by doubling them. For example, this CSV would fail because "Bill" adds quotes but does not escape them:
"William "Bill" Jones","216 Jefferson St","Virginia"
In this instance, the quotes around "Bill" must be escaped by doubling the quotation marks around "Bill":
"William ""Bill"" Jones","216 Jefferson St","Virginia"
Inconsistent or incorrect delimiters: CSV stands for comma separated values. If a file is missing a comma, has an extra comma, or uses inconsistent delimiters (e.g., comma and tab) it can cause the importer to fail to parse the file correctly. If your file uses a different delimiter that is not automatically recognized by the importer, you can specify the correct delimiter in the Advanced options in the import preview.

Inconsistent row lengths: CSV files must have the same number of fields in each row. If one line has more comma separated values than another line, it will lead to CSV parsing errors.
Missing or misaligned headers: If your file lacks a header row or the header row is misaligned with the data, it can cause import errors. You should also not use duplicate column names. Repeated column names can lead to ambiguity in parsing CSV files. When you expand Advanced options on the import preview, you can select to ignore the header row and/or skip X number of rows.
Corrupt data or invalid characters: If your CSV file contains corrupted or unexpected data, such as binary data in a text column or invalid characters, it can lead to parsing errors or get interpreted incorrectly and appear as gibberish.
Locale differences: You may experience issues when using number or date formats that differ from the expected locale (e.g. 1,234.56 vs 1.234,56). For locale differences, you may be able to use formulas like NUMBERVALUE to convert to your desired format after import.
Whitespace issues: Leading or trailing whitespace in fields (extra spaces) can cause unexpected results. If your file doesn't import correctly or seems to be missing data, try looking for and removing extra spaces.
Extra, missing, or inconsistent line breaks: Extra blank lines, missing line breaks, or improper or inconsistent end-of-line (EOL) characters can disrupt parsing. The two common EOL characters are LF (Line Feed) (which is \n and used by Linux and macOS) and CRLF (Carriage Return + Line Feed) (which is \r\n and used by Windows). On the import preview under Advanced options, you can specify the EOL characters under Terminator. In most instances, you do not need to worry about EOL characters since most tools where you'd get your CSV from will use proper EOL characters. When you import into Row Zero you will not see the EOL characters by default as is the case with Excel, Google Sheets, and most tools. Some specialized editors like Notepad++ have features to make EOL characters visible.
Encoding issues: The most widely used encoding for CSV files is UTF-8. This supports virtually all characters, including special characters and international characters and is recommended for compatibility across applications. Row Zero, Excel, and Google Sheets open CSV files encoded in UTF-8. When you export CSV files from any common software program, the default encoding is UTF-8, so you typically won't need to worry about this.
If you need to troubleshoot CSV errors you can try reaching out to whoever produced the file, inspecting the file in a text editor like Notepad++, or cleaning the file programmatically with Python. View tips for troubleshooting common import errors.
Importing XLSX files
When importing XLSX files, you may experience issues if your file contains features we do not yet support. These include some formula functions, anything related to VBA or macros, and some features related to formatting, charts, and pivot tables. While Row Zero supports the common spreadsheet features and functions, there is a long-tail of obscure functions we do not yet support, so you may see an error in cells with unsupported formulas. You can view a full list of Row Zero functions here. If there is a particular function that you'd like us to support, please contact us. If you experience issues importing an XLSX file, you can try downloading as a CSV instead and then importing into Row Zero. While downloading as a CSV will convert the file to plain text values with no formulas or formatting, it may improve data integrity.
Importing large files
The Row Zero Free, Pro, and Business plans supports up to 5GB datasets, so if your file is under 5GB, it is unlikely that data size is the issue. Enterprise plans can support much larger datasets and scale with needs.