Formatting Data in Row Zero:
- Typical spreadsheet formatting
- Conditional formatting
- Format painter
- Custom formatting with the TEXT function
- Formatting data tables
- Formatting CSV files
- Questions about formatting
Typical spreadsheet formatting
Row Zero supports all of the typical formatting options you would expect in a spreadsheet. Row Zero generally works like Excel and Google Sheets and incorporates typical keyboard shortcuts for formatting (e.g. Ctrl + B for bold).  NOTE: Depending on your screen size and zoom level, you may need to expand the formatting menu by clicking on the 3 dots to the right to expand the full menu.
Conditional Formatting
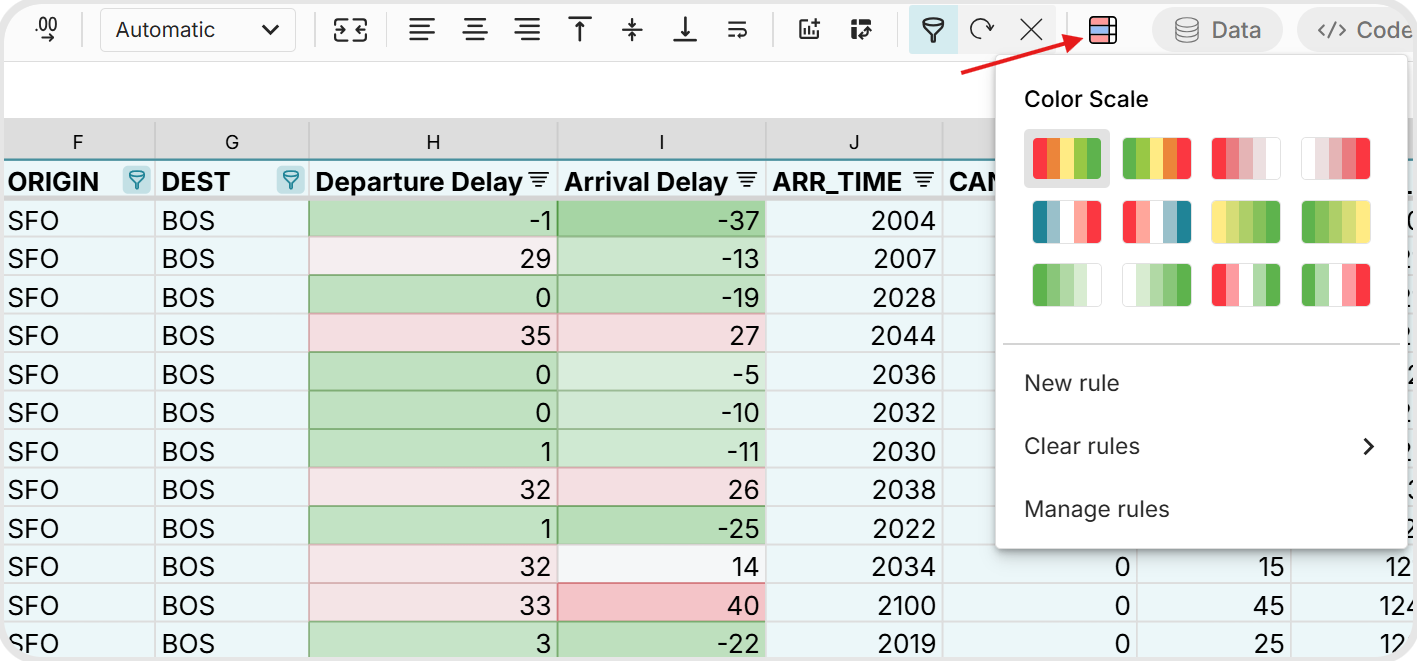 Conditional formatting can be applied to cell ranges or columns in data tables by clicking the conditional formatting icon in the menu. Note, if you are zoomed in or working on a small screen, you may need to click the three dots to expand the menu to reveal all options.
Steps to apply conditional formatting:
Select the cell range you would like to apply formatting to
Click the conditional formatting icon in the menu (see screenshot above) and choose your option:
- By Color Scale: Click on a color scale to automatically apply the color scale to the selection. Conditional formatting by color scale automatically formats the scale based on the min and max of the specified range. Note, we do not yet support changing the min, median, or max values that scale the formatting.
- By Value: Click New rule to apply a new conditional formatting rule by value
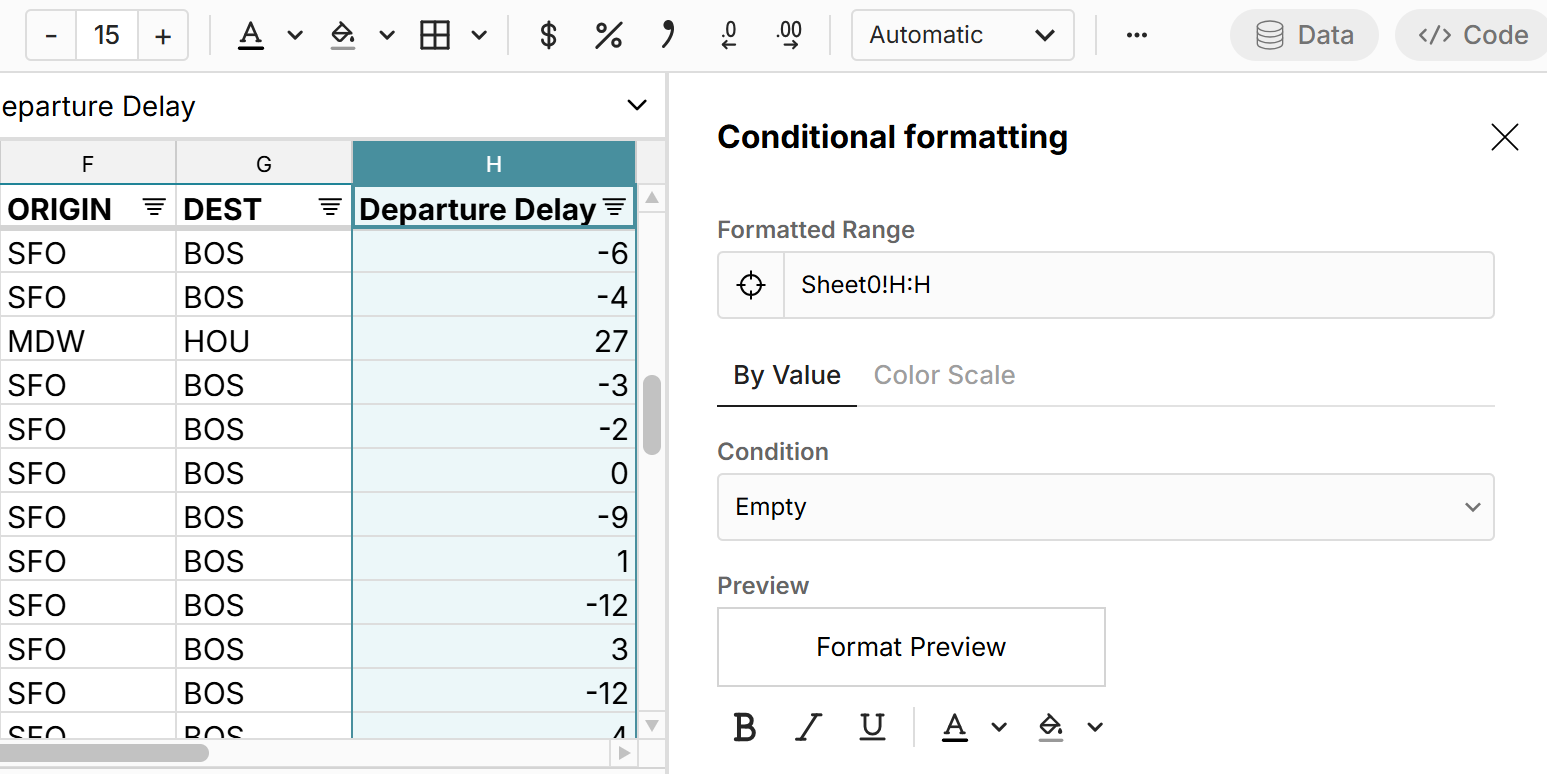
If applying a new rule by Value, you have several options for setting the Condition for applying the formatting:
- Empty
- Not Empty
- Greater than
- Greater than or equal to
- Less than
- Less than or equal to
- Equal to
- Not equal to
- Between
- Not Between
- Text contains
- Text does not contain
- Text starts with
- Text ends with
- Text equals
- Date equals
- Date before
- Date after
- Date between
- Unique
- Duplicate
- Custom Formula
Once you've set your condition, you can select the format to apply when cell values meet your condition and you are given a Preview of this format.
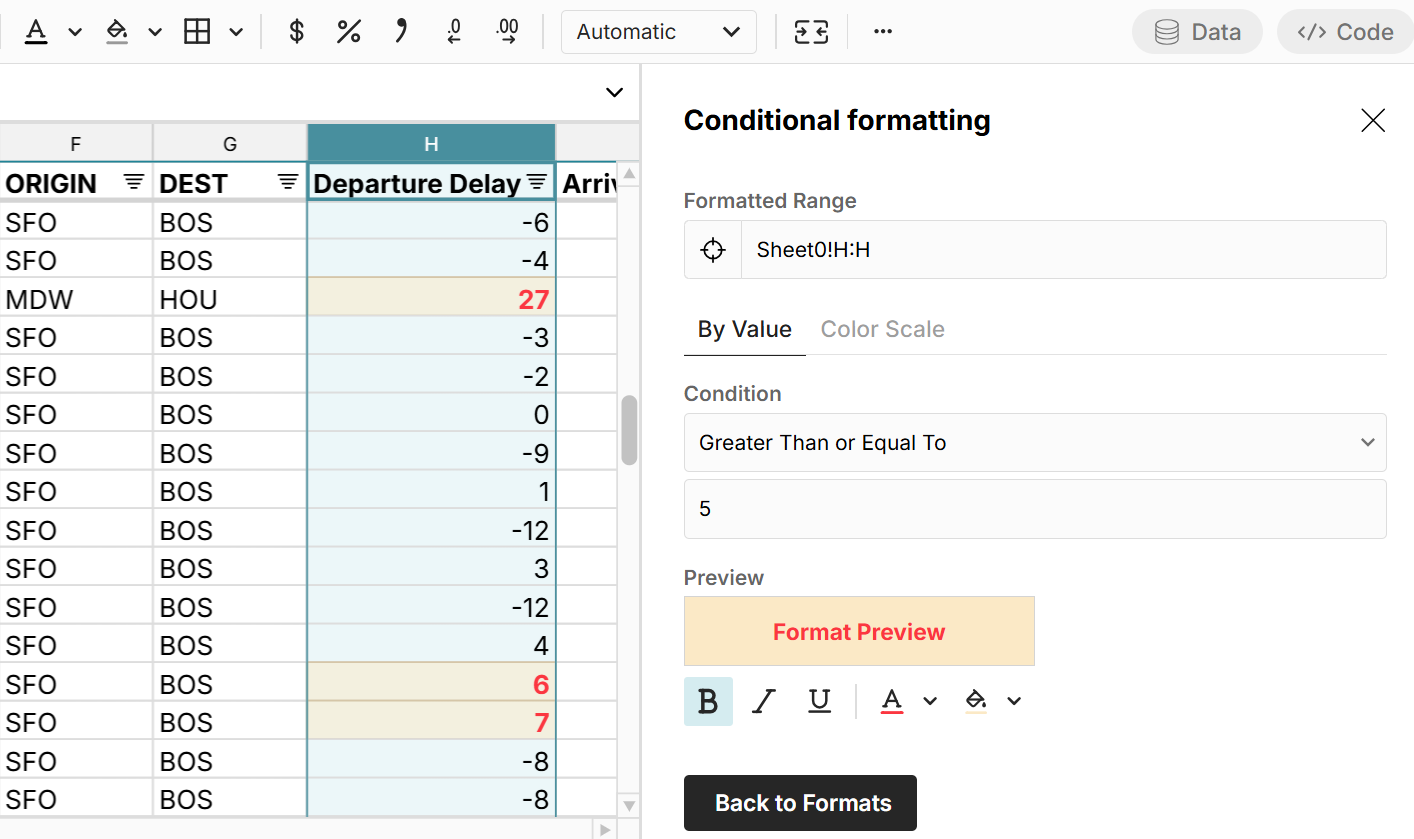 The formatting is automatically applied to the selection as you select the formatting.
When done, click Back to Formats to manage formatting rules and/or apply new rules, or click the X in the top right to close the window.
Managing conditional formatting rules
You can manage conditional formatting rules by clicking the conditional formatting icon and selecting Manage rules. You are also taken to the formatting manager when you click Back to Formats when applying a new formatting rule.  Within this window, you can add new rules, click on a rule to edit it, delete rules, and also change the hierarchy of rules by selecting the 6 dot icon to the left of the rule and moving it up or down.
Removing conditional formatting
To clear conditional formatting, click the conditional formatting icon, select Clear rules and choose to either Clear rules in selection or Clear all rules on sheet. You can also delete specific rules by clicking the trash can icon next to the rule in the Manage rules window. 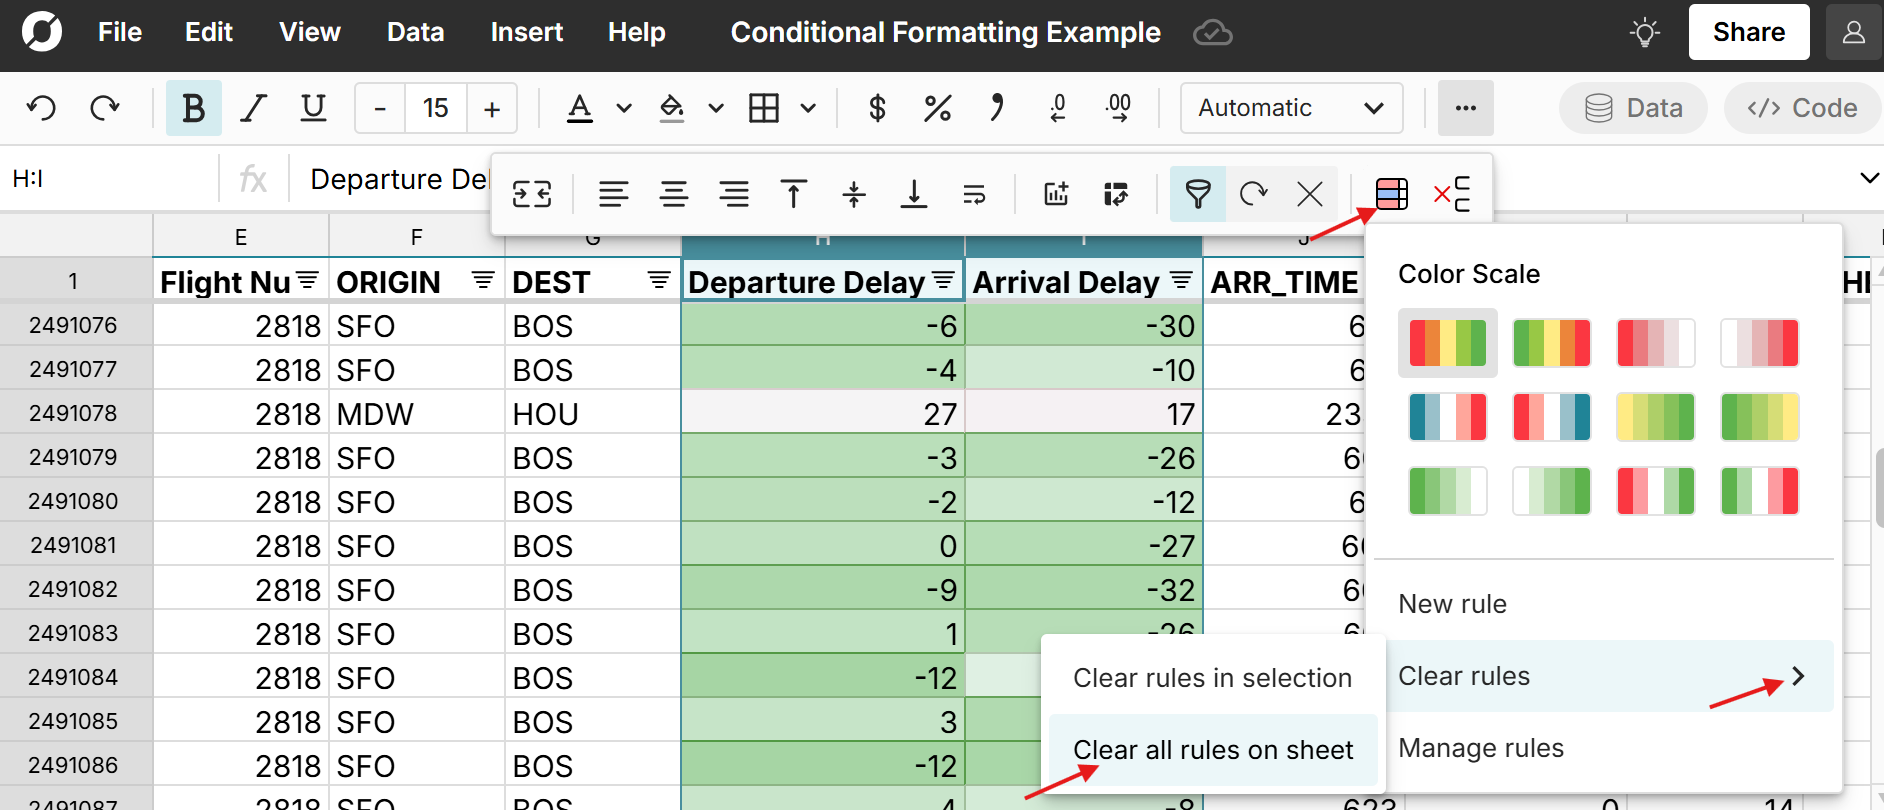
Conditional formatting with formulas
Conditional formatting using formulas gives you a wide range of options to format your data. You can easily apply conditional formatting based on another cell, column, or row and use functions in conditional formatting formulas. 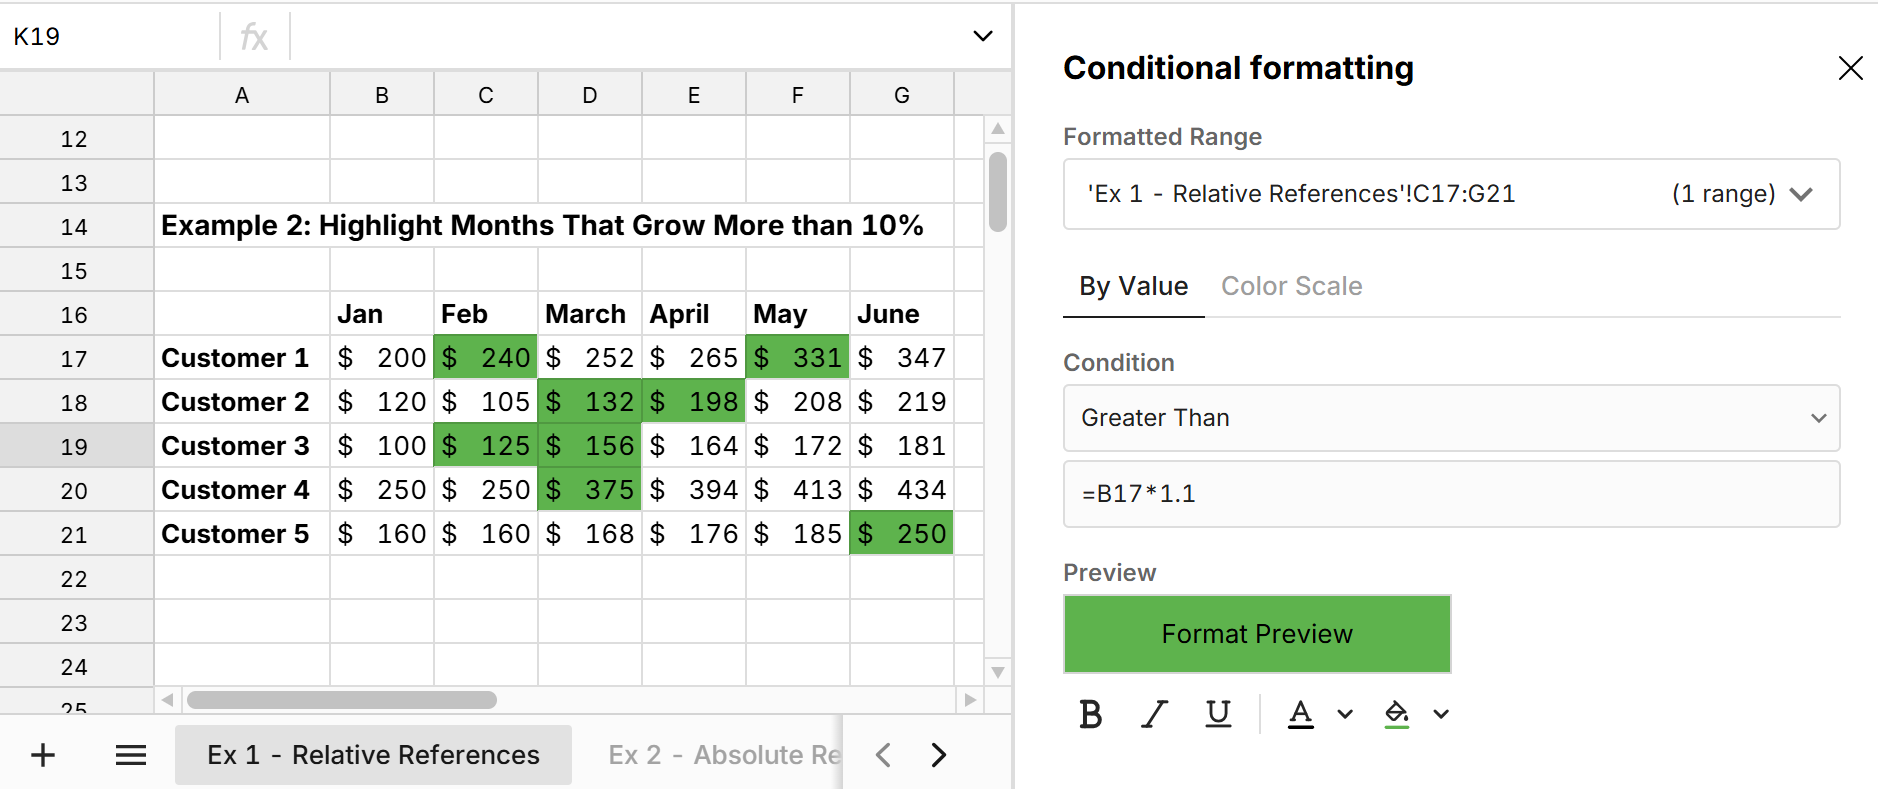 Conditional format formulas start in the top-left cell of the format range and drag down and to the right across the format range by default, but you can use "$" to set absolute references, so formatting is based on a specific cell or range. Learn more about conditional formatting with formulas and view examples here.
Format painter
Format painter makes it easy to replicate formats in your workbook. Simply select the formatted cells you’d like to replicate, click the format painter icon, and then click on the cell where you’d like this formatting to be applied (formatting starts from the top-left cell).
Your selected formatting will be applied to the new area. Format painter works with all types of formatting, including conditional formatting.
If you double-click on the format painter icon, you can repeatedly apply the selected formatting to multiple destination ranges. You can also select a specific range for applying a format, instead of a starting cell. If the destination range is larger than the original, the format will repeat across the range.
Custom formatting with the TEXT function
The TEXT function lets you apply custom formatting to numbers, dates, and time values and uses custom format codes to give precise control over how data is displayed and presented. 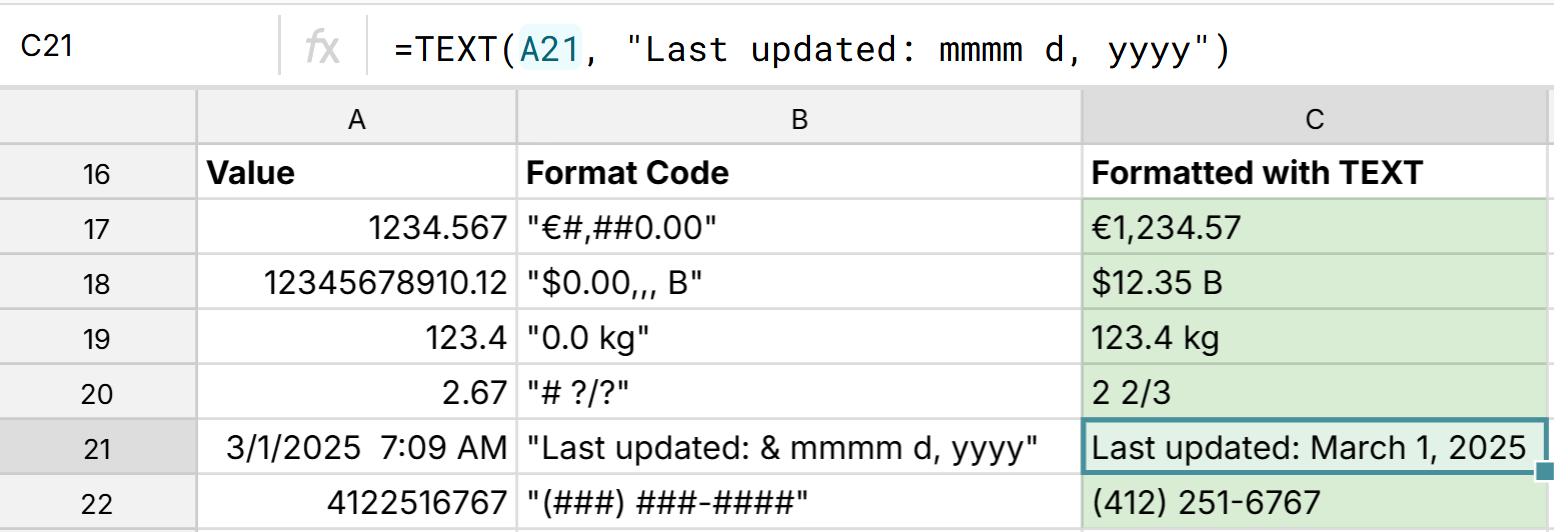
View our post, How to format with the TEXT function, for the list of custom format codes and several examples.
Formatting Data Tables
Data Tables are a convenient way to view and manage large data sets and maintain dynamic data connections in Row Zero. When you import data from a data connection (e.g Snowflake) or create a pivot table, the data is stored in a data table by default. You can also choose to import a file as a data table or use the DATATABLE function to convert cells into a data table.
Cells within a data table are read-only and cannot be edited or deleted. Data tables support column level transformations, so you can format columns in a data table (and apply formulas referencing columns in a data table) but cannot format individual cells in a data table, with one exception - cells in the data table header row can be formatted individually. You can apply any type of formatting to columns in a data table. Data tables dynamically update as source data updates and all data table formatting is preserved.
NOTE: at any time you can right-click and "Explode" the data table to normal cells where you can edit and format cells individually. The primary drawback of doing this is that it breaks the connection to the underlying data so the data will not update as source data changes. It is recommended that you right-click > copy > paste the table and explore the copied table so that your original data table remains dynamic and auto-updates.
When you right-click on a data table you'll see a number of options for working with the data. 
In addition to exploding into cells and copying the table, you can manage and hide columns, sort, filter, pivot, and export to CSV or connected data source.
You can also increase the size of a data table by dragging the bottom of the window down.
Formatting CSV files
CSV files inherently do not have any formatting. CSVs are plain text files where data is separated by commas (comma separated values). When you import a CSV to Row Zero, Row Zero will automatically infer dates and numbers as such, but will not apply any formatting. Once imported, you can format CSV data just like any other Row Zero workbook. If at any point you download your Row Zero workbook as a CSV, you will lose all formatting and any formulas will be converted to values. This is the same behavior in any application including Excel and Google Sheets. When you convert to CSV, data is converted to plain text values. Therefore if you downloaded data from another application like Google Sheets as a CSV and then import into Row Zero, you'll only be importing plain text values.